Nagios is an open-source monitoring software that allows system administrators to monitor the health and performance of servers, applications, and network devices. Nagios provides a comprehensive solution for monitoring the IT infrastructure and can alert administrators of potential problems before they become critical.
In this article, we will go over the steps to install Nagios on CentOS and Red Hat Enterprise Linux (RHEL) 9/8. These steps cover everything from downloading the software to configuring authentication for the Nagios web interface.
By the end of this article, you will have a fully functional Nagios server that can be used to monitor your IT infrastructure. So, let’s get started!
Before we begin, make sure that you have a server running either CentOS or RHEL 9/8, with root access or a user with sudo privileges. Additionally, ensure that your server is up-to-date by running the following command:
sudo yum update -y Before we install Nagios, we need to install a few dependencies: Apache web server, PHP, and GCC. You can install these by running the following command:
sudo yum groupinstall "development tools"sudo yum install httpd php php-cli gcc unzip wget glibc glibc-common gd gd-devel net-snmp
Nagios requires a user and group to run its processes. To create these, run the following commands:
sudo useradd nagiossudo groupadd nagcmdsudo usermod -a -G nagcmd nagiossudo usermod -a -G nagcmd apache
To download Nagios Core, we will use the wget command to download the latest version of Nagios Core from the official website. At the time of writing, the latest version is 4.4.5. Run the following command to download it:
wget https://assets.nagios.com/downloads/nagioscore/releases/nagios-4.4.10.tar.gz Once the archive has been downloaded, we can extract it using the following command:
tar xzf nagios-4.4.10.tar.gz To compile Nagios Core, navigate to the extracted directory using the following command:
cd nagios-4.4.10 Next, run the following command to compile Nagios Core:
./configure --with-command-group=nagiosmake all
Once the compilation is complete, we can install Nagios Core by running the following commands:
sudo make installsudo make install-commandmodesudo make install-initsudo make install-configsudo make install-webconf
Nagios Plugins are required to extend the functionality of Nagios Core. After installing and configuring core service, Download latest nagios-plugins source and install using the following commands.
wget http://nagios-plugins.org/download/nagios-plugins-2.4.3.tar.gzsudo tar xzf nagios-plugins-2.4.3.tar.gzcd nagios-plugins-2.4.3
Now compile and install nagios plugins
./configure --with-nagios-user=nagios --with-nagios-group=nagcmdsudo makesudo make install
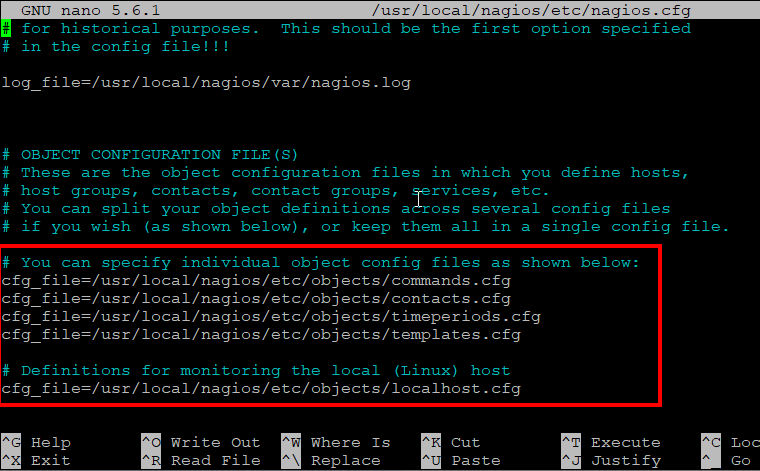
To configure Nagios, we need to edit the Nagios configuration file. To do this, run the following command:
sudo nano /usr/local/nagios/etc/nagios.cfg In the configuration file, check for the following line, add them if not available:
Save and close the file.
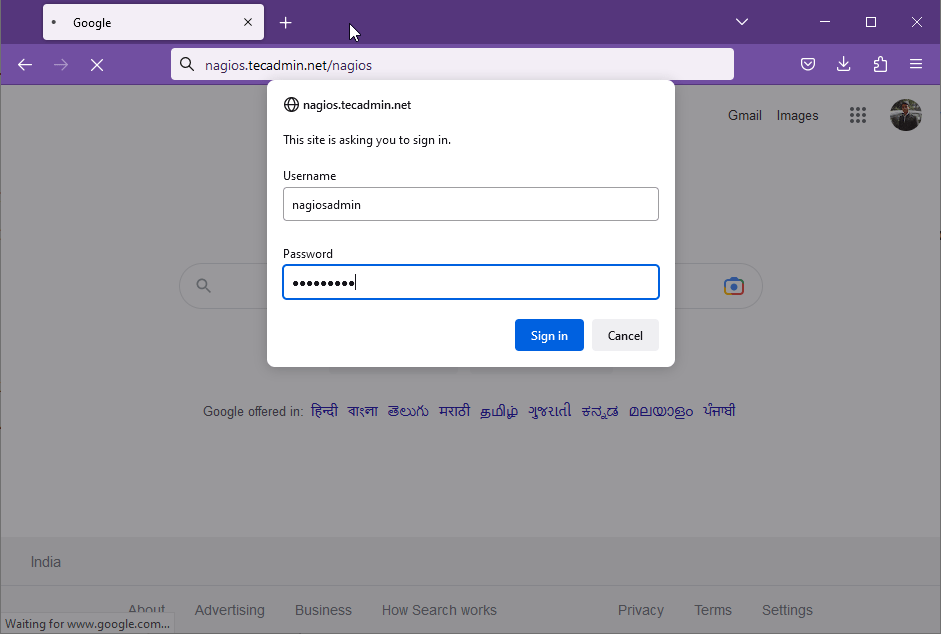
By default, Nagios requires authentication to access the web interface. To set up authentication, run the following command to create an admin user:
sudo htpasswd -c /usr/local/nagios/etc/htpasswd.users nagiosadmin Enter a strong password to complete the process.
First, verify the Nagios configuration file using the following command.
/usr/local/nagios/bin/nagios -v /usr/local/nagios/etc/nagios.cfg If there is no error found, run the following command to enable and start Nagios service:
sudo systemctl enable nagiossudo systemctl start nagios
Next, start the Apache web server using the following command:
sudo systemctl start httpd Finally, you can access the Nagios web interface by navigating to http://your-server-ip-hostname/nagios in your web browser. You will be prompted to enter the username and password you created in step 8.
After successful authentication, you will get the Nagios core dashboard access.
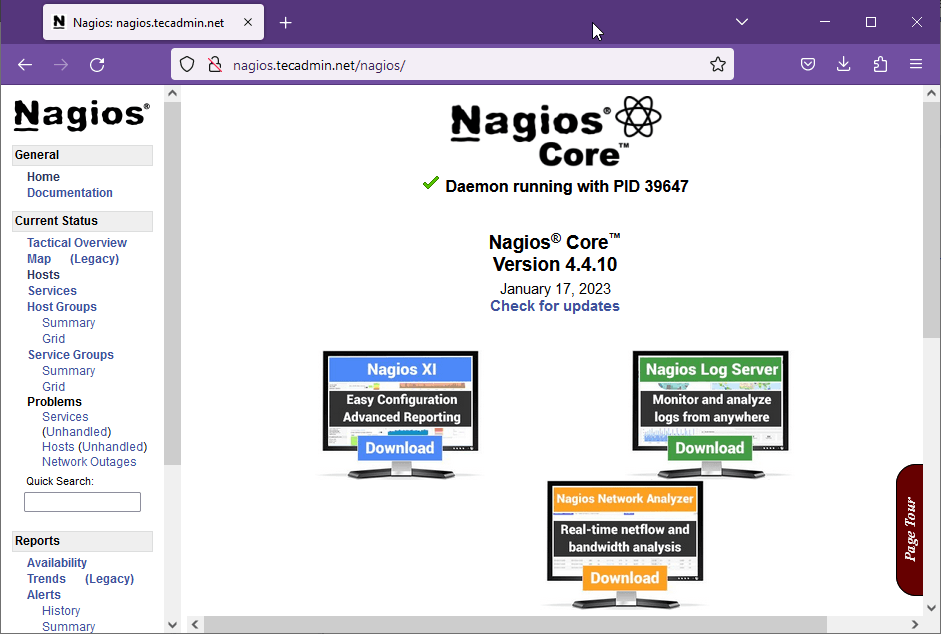
Here you can find the detailed information about Nagios hosts, services, notification etc.
In this article, we have gone over the steps to install Nagios on CentOS and RHEL 9/8. Nagios is a powerful open-source monitoring software that can help you monitor the health and performance of your systems and applications. With the steps outlined in this article, you should be able to get Nagios up and running on your server in no time.
Excellent post! We will be linking to this particularly great content on our site. Keep up the good writing.
Stephony on December 12, 2019 10:22 amGreat information shared. Adding a few lines about Nagios, ” Nagios provides complete monitoring of Linux operating systems and distributions – including operating system metrics, service state, process state, file system usage, and more.”
Awesome!. Perfect guide.Your first step successfully done[How to Install Nagios 4 (Monitoring Server) on CentOS/RHEL 7/6] & its very helpful to understand. Would u plz tell me process, how to add host? & what another services are need to installed ? Plz Note I am using centos7 . Reagards
This is just a simple guide, but check some examples. –Open this file
nano /usr/local/nagios/etc/nagios.cfg —search and uncoment
#cfg_file=/usr/local/nagios/etc/objects/switch.cfg —to cfg_file=/usr/local/nagios/etc/objects/switch.cfg —close file —Open and add these command below (host and 2 services to monitoring)
nano /usr/local/nagios/etc/objects/switch.cfg define host use generic-switch
host_name switchcore01
alias swtich main num 1
address 10.10.10.3
hostgroups switches
> define service use generic-service
host_name switchcore01
service_description PING
check_command check_ping!200.0,20%!600.0,60%
normal_check_interval 5
retry_check_interval 1
> define service use generic-service
host_name switchcore01
service_description Uptime
check_command check_snmp!-C MYCOMMUNITYHERE -o sysUpTime.0
> —-close the file —–checck the config
sudo /usr/local/nagios/bin/nagios -v /usr/local/nagios/etc/nagios.cfg — now reload the service sudo service nagios reload —-You can see on the web browser. Regards
Hi I followed all lines.
While i was writing command make make all
got error “make: *** No rule to make target `all’. Stop.”
make utility allready installed.
Please help in this.
hi i am serge
i have install nagios properly when i run nagios.service i have this message “job for nagios.service failed because the control process exited with error code” thanks for your help
Hi Team, I installed Nagios on Linux, with all the steps as mentioned above. but while logging I am not able to login. getting error like
” Authorization Required This server could not verify that you are authorized to access the document requested. Either you supplied the wrong credentials (e.g., bad password), or your browser doesn’t understand how to supply the credentials required. Apache/2.2.15 (Red Hat) Server at 172.29.218.194 Port 80″ Can some one help on this please.
i have gone through all the commands its open login page where i put the user nagioadmin and password i gave at the time of creation on user, but the user is not authenticated, please tell me whats error. i have changed the password of this user as well but go not log in. please tell
Hey Bilal,
Not sure if you have the correct user name. It is nagiosadmin and not nagioadmin . I was able to get it working without any issues
Very good notes and i have one question if you create a two user u1 and u2
and first log in to u1 and without logout
try to log in to u2 it is asking some password
by defualt what password it is tacking can you please solve this query….
Complete steps! – installed on CentOS 6 x64 after much trying and reading… Nagios Centos Install # rpm -Uvh http://download.fedoraproject.org/pub/epel/6/x86_64/epel-release-6-8.noarch.rpm
# rpm -Uvh http://rpms.famillecollet.com/enterprise/remi-release-6.rpm
yum –enablerepo=remi install httpd
service httpd start
chkconfig httpd on
sudo rpm -Uvh http://dev.mysql.com/get/mysql-community-release-el7-5.noarch.rpm
yum install mysql mysql-server
service mysqld start
yum install php php-mysql
yum install php-common php-cli php-mysql php-devel
service httpd restart
service mysqld restart
yum install httpd php php-cli gcc glibc glibc-common gd gd-devel net-snmp
service httpd start
useradd nagios
passwd nagios Step 2: Setup User Accounts
Now create a new nagios user account and setup a password to this account
# useradd nagios
# passwd nagios
Now create a groud for nagios setup “nagcmd” and add nagios user to this group. Also add nagios user in apache group.
# groupadd nagcmd
# usermod -a -G nagcmd nagios
# usermod -a -G nagcmd apache
Step 3: Install Nagios Core Service
After installing required dependencies and adding user accounts. Lets start with Nagios core installation. Download latest nagios core service from official site.
# cd /opt/
# wget http://prdownloads.sourceforge.net/sourceforge/nagios/nagios-4.0.8.tar.gz
# tar xzf nagios-4.0.8.tar.gz
# cd nagios-4.0.8
# ./configure –with-command-group=nagcmd
# make all
# make install
# make install-init
# make install-config
# make install-commandmode
Now use below command to setup apache configuration for Nagios installation.
# make install-webconf
Step 4: Configure Apache Authentication
We need to setup apache authentication for user nagiosadmin. Do not change this username. else you would required more changes in configuration.
# htpasswd -c /usr/local/nagios/etc/htpasswd.users nagiosadmin
Now restart Apache service to make the new settings take effect.
# service httpd restart
Step 5: Install Nagios Plugins
After installing and configuring Nagios core service, Download latest nagios-plugins source and install using following commands.
# cd /opt
# wget http://nagios-plugins.org/download/nagios-plugins-2.0.3.tar.gz
# tar xzf nagios-plugins-2.0.3.tar.gz
# cd nagios-plugins-2.0.3
Now compile and install nagios plugins
# ./configure –with-nagios-user=nagios –with-nagios-group=nagios
# make
# make install
Step 6: Verify and Start Nagios
Use the following commands to verify nagios install and start nagios core service.
# /usr/local/nagios/bin/nagios -v /usr/local/nagios/etc/nagios.cfg
# service nagios start
Also configure nagios service to start on system start
# chkconfig –add nagios
# chkconfig nagios on
firewall-cmd –add-port=80/tcp –permanent # vim /etc/sysconfig/selinux
SELINUX=disabled REBOOT SERVER. Service mysqld start
service https start
service nagios start Logon on to nagios from web brower!
it’s not comment
thank you so much for your effort writing this article
i want to say unzip is a mandatory package for installation
Hello Rahul,
i have a question,
why we have to install apache and not nginx? (I am not asking the differences between them) but it has to do with the nagios program? e.g isn’t compatible or something like that?
Successfully Installed through follow your steps. but what is the main benefit for to install nagios ?
With Nagios, you can monitor your entire infrastructure (critical servers and network components) with ease, on a web interface. In case anything goes wrong, you receive a notification and the issue gets addressed in timely manner. And best thing is that, Nagios Core is Free and Open Source, so you can customize it as per your needs. Thanks.
I followed the steps and it works the only issue I had it was:
Permission denied: exec of ‘/usr/local/nagios/sbin/statusjson.cgi’ failed, referer: http://myserver/nagios/main.php
I fixed with
chcon -R -t httpd_sys_content_t /usr/local/nagios Thanks
Hi
I finish all progress . but I can’t see local host status
Current, My nagios web page show the message ‘unable to get process status’
Do you know this problem?
I am getting this error when i am trying to open via browser Forbidden You don’t have permission to access /nagios on this server.
Hi, We are trying to install this, and all went well – but on the homepage we get an error saying “Unable to get process status” and no other page will load – internal server error. Steve
Jonathan on December 7, 2014 7:09 pmI had this problem as well. Try the selinux suggestion above. When things don’t work and you did everything right with no errors, for me 9 times out of 10 the problem is selinux. I try to remember to try this first now.
Hello,
I have followed these steps and it is successfully installed on my VM (CentOS) and everything was fine but next day when I again poweered on my VM and tried to take web access it gives me an error I have checked nagios service and process as well but no use I’m not able to get my web access
any one can help…
“” FACING PROBLEM WITH FOLLOWING ERROR”
make[1]: Leaving directory `/opt/nagios-plugins-2.0.3/po’
make[1]: Entering directory `/opt/nagios-plugins-2.0.3′
make[2]: Entering directory `/opt/nagios-plugins-2.0.3′
make[2]: Nothing to be done for `install-exec-am’.
make[2]: Nothing to be done for `install-data-am’.
make[2]: Leaving directory `/opt/nagios-plugins-2.0.3′
make[1]: Leaving directory `/opt/nagios-plugins-2.0.3′
[root@localhost nagios-plugins-2.0.3]# /usr/local/nagios/bin/nagios -v /usr/local/nagios/etc/nagios.cfg
bash: /usr/local/nagios/bin/nagios: No such file or directory
![]()